Thinking about a bathroom remodel in Orange County but not sure where to start? You’re in the right place. A successful remodel isn’t just about pretty tile and new fixtures; it’s about planning, sequencing, and making dozens of decisions in the right order so the finished space works beautifully every day. After 30+ years remodeling bathrooms across Southern California, CALbath has refined a predictable process that keeps projects organized and stress low. Use this step-by-step checklist to move from idea to installation with confidence.
Step 1: Define the “why”—function first, then finishes
Begin with what’s not working. Do you need better storage, brighter light, a safer shower, or simply less maintenance? Create a short list of must-haves, nice-to-haves, and deal breakers. During your design consultation, CALbath translates that list into a layout and selections that solve daily pain points; afterward, we layer in the style you love.
Step 2: Establish scope and ballpark budget
First, decide whether this is a full bathroom remodel or a focused refresh. Full remodels typically address layout, waterproofing, ventilation, lighting, cabinetry, surfaces, and glass. If you plan to sell in the next few years, prioritize durable, low-maintenance choices that photograph well and appeal broadly. In turn, CALbath helps right-size the scope so you invest where it matters—behind the walls and on the surfaces buyers and inspectors notice most.
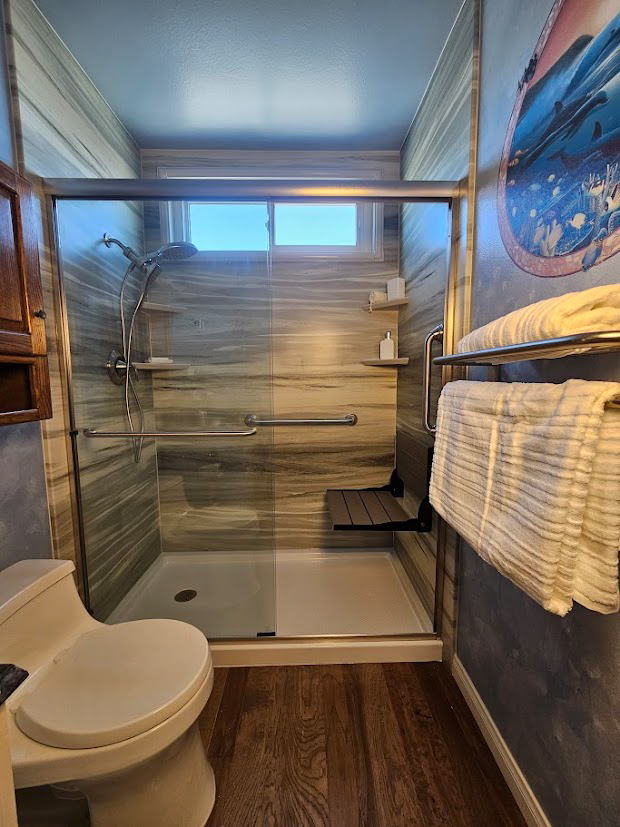
Step 3: Map your layout early
Good layouts feel bigger without adding square footage. Accordingly, we check clearances, door swings, window placement, and plumbing runs to avoid surprises. Many Orange County baths tuck a window into the tub/shower zone; therefore, we tile returns, plan privacy glass where needed, and position fixtures to control splash. When possible, keeping plumbing near existing lines streamlines the timeline and leaves more budget for finishes.
Step 4: Choose surfaces that live as well as they look
Daily ease and long-term value start with smart materials. Porcelain tile delivers stone looks with less upkeep; engineered stone or premium wall panels minimize grout; mosaics add grip on shower floors and benches. If you love natural stone, we set realistic expectations for sealing and maintenance and design the shower to drain and dry correctly. As a result, CALbath pairs materials so the room feels cohesive—large-format on main walls, textured or smaller scale underfoot, and grout colors that hide everyday wear.
Step 5: Select fixtures for comfort, reliability, and style
Fixtures set the tone and shape the experience. Thermostatic or quality pressure-balance valves keep temperature steady; meanwhile, a primary showerhead paired with a handheld sprayer on a slide bar adds flexibility. Coordinate finishes—brushed nickel, matte black, or champagne tones—across valve trim, tub filler, drains, and hardware so everything reads as one design. Before installation, CALbath verifies compatibility with existing rough-ins and advises when an upgrade makes sense.
Step 6: Plan lighting and ventilation together
Light changes how your tile and skin tone read, while ventilation protects everything you’re investing in. We layer task lighting at the vanity, a shower-rated fixture where appropriate, and dimmable ambient light for evenings. In addition, quiet, efficient fans move moisture out fast and keep glass clearer and grout crisper. Consequently, these “invisible” choices pay you back every single day.
Step 7: Design storage that disappears
Clutter makes even beautiful bathrooms feel chaotic. To counter that, we build storage into the architecture: full-height niches set away from direct spray, a slim ledge in the shower for everyday items, drawer organizers at the vanity, and mirrored cabinets where they make sense. With CALbath, storage looks like part of the room, not an afterthought.
Step 8: Confirm waterproofing and construction details
Behind the tile is where projects succeed. Our crews install proper membranes and backer boards, pitch pans to drain, place movement joints where they belong, and block walls for future grab bars or accessories. We also treat glass as part of the water management system—not just a pretty detail—so thresholds, seals, and anchoring all perform. Because of this craft-first approach, homeowners choose CALbath for bathrooms that last.
Step 9: Build a realistic schedule (and protect the home)
Next, we sequence demo, rough plumbing and electrical, inspections where required, waterproofing, surfaces, cabinetry, glass, and final finishes. During construction, adjacent areas are protected, the jobsite stays tidy, and updates arrive on a predictable cadence so you always know what’s next. As a result, a clear schedule reduces stress and keeps quality high.
Step 10: Walkthrough, care tips, and long-term support
At the finish, we review every detail with you and share simple care routines tailored to your materials. Large-format porcelain benefits from quick wipe-downs and a neutral cleaner; coated glass loves a fast squeegee and gentle soap; stone stays happy with the right sealer and pH-appropriate products. Ultimately, you leave with a bathroom that looks incredible and a plan to keep it that way.
Why Orange County Homeowners Choose CALbath
Specialists, not generalists. Bathrooms are what we do, and three decades of focused experience show up in the details you can see—and the ones you can’t.
Quality brands, curated wisely. We recommend materials that earn their keep in wet spaces, not just what’s trending.
Process that reduces stress. From consultation to final walkthrough, our communication and scheduling keep projects predictable.
Professional installation and waterproofing. We build bathrooms that pass inspections and stand up to everyday life.
5-star service. Homeowners call us back for their next bath because the first one still looks great.
Sample Timeline (What a Smooth Remodel Feels Like)
Week 1: Finalize design, selections, and schedule.
Week 2–3: Demolition, rough plumbing/electrical, inspections as needed.
Week 4–5: Waterproofing, tile/surfaces, cabinetry, lighting, and ventilation.
Week 6: Glass measure/installation, finishing touches, walkthrough.
Timelines vary by scope and lead times; however, the experience remains the same—organized, transparent, and respectful of your home.
Common Pitfalls to Avoid (We Steer You Around Them)
Rushing selections, mixing too many metals or tile patterns, skipping ventilation upgrades, ignoring waterproofing quality, and under-planning storage can sabotage an otherwise beautiful bath. Thankfully, CALbath catches those issues early and resolves them on paper before they become costly in the field.
Ready to Plan Your Orange County Bathroom Remodel?
A bathroom that looks bigger than its footprint, lives easier than before, and holds up to daily use starts with smart planning. With CALbath, you get a partner who handles the details, keeps the schedule, and delivers craft that lasts—so you can enjoy your space, not manage a project.
Schedule a Free, No-Obligation Design Consultation
Ready to stop guessing and start planning? The design experts at CALbath have helped thousands of homeowners across Orange County and San Diego create bathrooms they love. Contact us today to schedule your completely free, no-obligation design consultation and see what 30 years of experience can do for your home. Prefer to chat first? Call for a quote and we’ll walk through your goals, scope, and next steps.